


While using Graphql with Flutter for one of my projects, I found out that there is a lack of resources/tutorials to learn this on the internet. So, here I am creating an additional resource to help out anyone who wants to use GQL with Flutter.
Let's start by understanding, what are GraphQL and Flutter?
GraphQL
GraphQL is a query language for your API. But it provides a very important advantage over the traditional REST APIs. GraphQL provides you with the power to ask for exactly the data you need, nothing more, nothing less.
To consume GraphQL APIs, we need a client for our front-end application. But where do we find a client for our flutter app?
Well, for now we have two options:
We are going to use graphql_flutter for this tutorial.
Flutter
Flutter is Google's SDK for creating cross-platform applications for Android, IOS, Web and Desktop with a single codebase. To create flutter applications, we use dart programming language.
Flutter comes with many pre-built widgets which are used to rapidly create applications. Also, there are many packages by the flutter and dart community to assist our development journey.
It will be a looong blog
Don't worry, there is an index

THE INDEX
0. Setup
2. Query
3. Mutation
We are going to create a simple single-user notes application using Flutter and GraphQL.
Part 0: Setup
0.1: Download skeleton app
- Go to github.com/udz-codes/noteplus-skeleton/tree..
- Clone the repo (skeleton branch)
The skeleton project is a notes app. It has nothing related to GraphQL yet.
0.2: Get packages
After cloning the skeleton project, we need to install all required packages.
- Open a terminal at the root of the project.
- Run the following command to get all packages from pubspec.yaml
flutter pub get
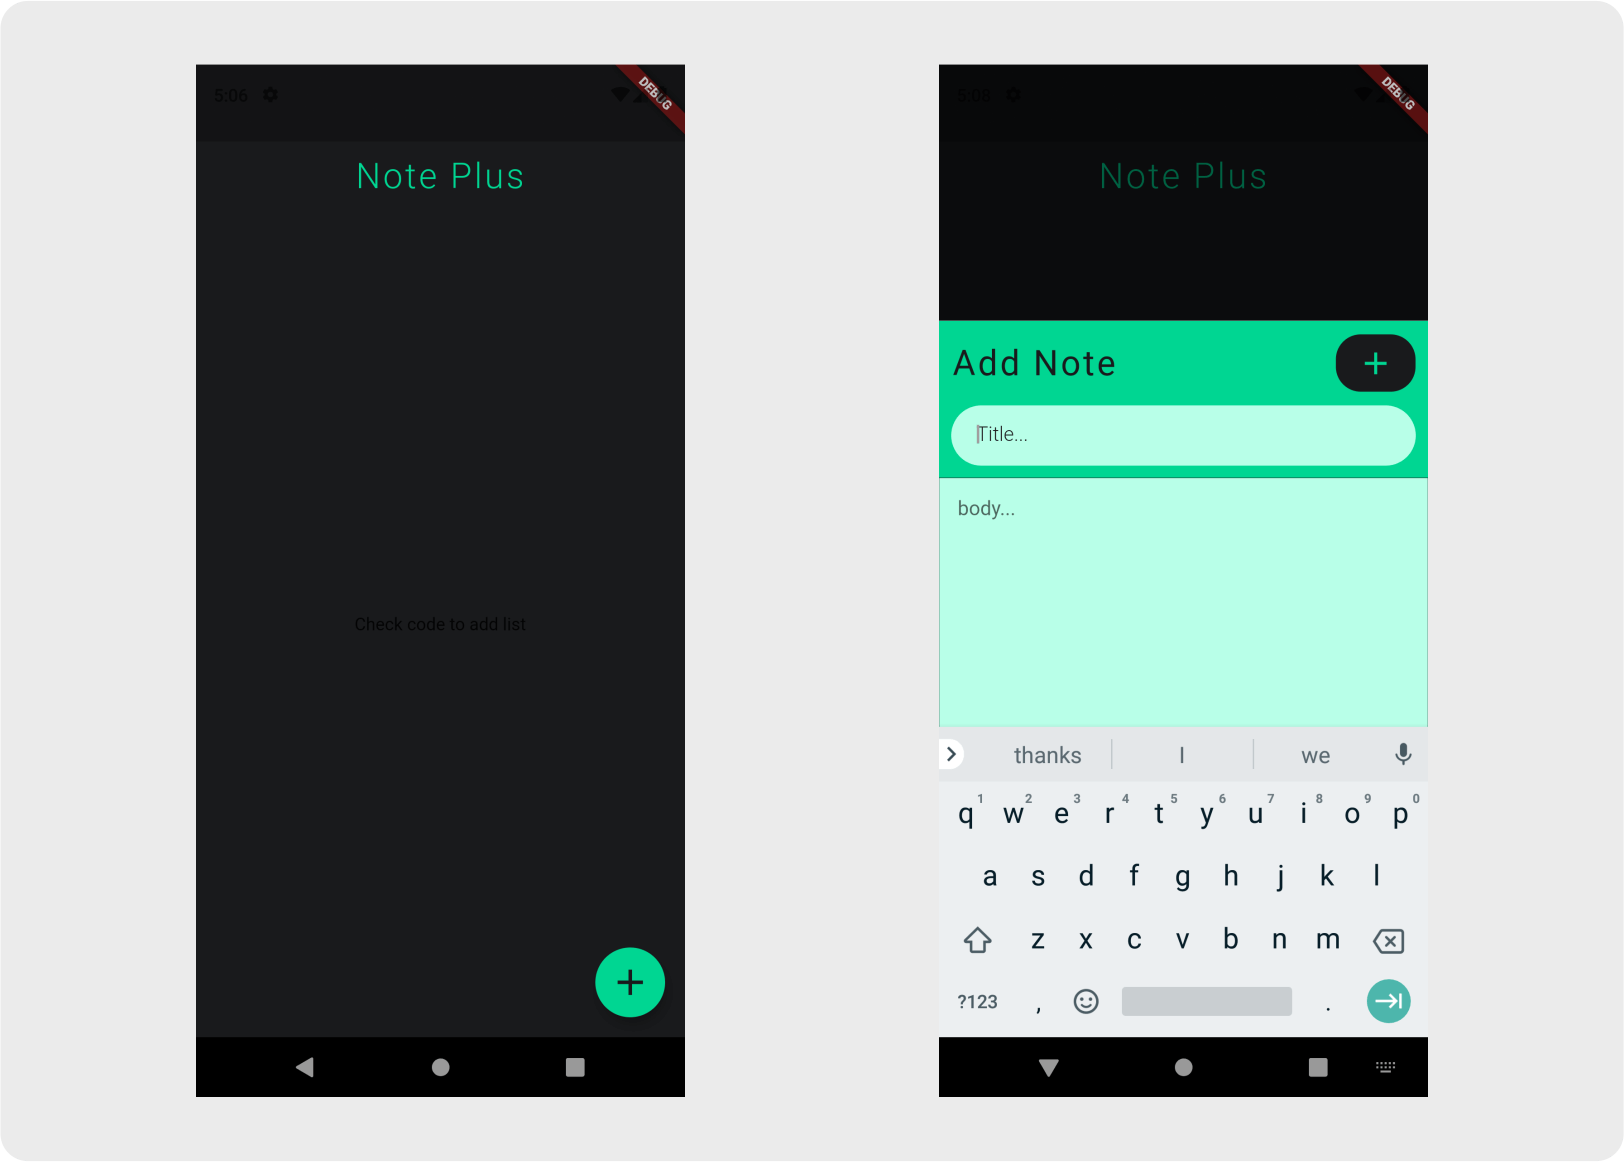
- Now you can run the app and the app will look like this.
0.3: The GraphQL API
I created a GraphQL API with Hasura for demonstration purposes.
My API schema is very simple. Just a single table called "Notes" with 4 fields.
- Note id (Datatype: integer [auto increment])
- Title (Datatype: Text/String)
- Body (Datatype: Text/String)
- Timestamp (Datatype: Timestamp)
You can follow Hasura Docs to create the API.
Part 1: GraphQL setup in Flutter
1.1: Install packages
- Go to pub.dev/packages/graphql_flutter/install
- Install graphql_flutter package for Flutter.
OR
- Open terminal at the root of the project and run this command
flutter pub add graphql_flutter - Now check pubspec.yaml and the package should show up under dependencies
1.2: Import the package
Add the following line at the top of main.dart file
import 'package:graphql_flutter/graphql_flutter.dart';
1.3: Initializing GraphQL Client
First, we will understand the parts of this code and at the end of this section, you will find complete code for main.dart
Here are the steps that we will follow:
- Create the endpoint link with the default headers.
- Create the client for our GraphQLProvider widget.
- Wrap our whole application in the GraphQLProvider widget.
The endpoint link
static HttpLink httpLink = new HttpLink(
  'https://noteplus.hasura.app/v1/graphql', // Api Endpoint
  defaultHeaders: {                         // Passing Headers
    'x-hasura-admin-secret': 'aLkLIOh8P0DXvjzSjXhdwSeWQaKd65o'
  }
);
Headers: The header is not required for using GraphQL with Flutter. But my API required this header.
You might want to pass the authentication token in the header, you can do that similarly.
The Client
Add this code below the httpLinkstatic ValueNotifier<GraphQLClient> myClient = ValueNotifier( GraphQLClient( cache: GraphQLCache ( store: InMemoryStore() // Store to keep our cache ), link: httpLink ) );
Store: We need to provide a store for caching. In this case, I have used InMemoryStore. Alternatively, we can create a HiveStore and use that instead.
Link: GraphQLClient takes an argument called "link", in which we have to mention an HttpLink with the endpoint and headers. In our case, the HttpLink is called httpLink.
GraphQLProvider
We will wrap the whole application in GraphQLProvider and mention the client that we want to use.@override Widget build(BuildContext context) { return GraphQLProvider( client: myClient, child: MaterialApp( title: 'Flutter Demo', theme: ThemeData( primarySwatch: Colors.grey, ), home: NoteApp(), ), ); }
Client: GraphQLProvider takes an argument called client and here, we mentioned that our client's name is myClient.
Final main.dart
import 'package:flutter/material.dart';
import 'package:noteplus/noteApp.dart';
import 'package:graphql_flutter/graphql_flutter.dart';
void main() {
runApp(MyApp());
}
class MyApp extends StatelessWidget {
// Creating link for our client
static HttpLink httpLink = new HttpLink(
'https://noteplus.hasura.app/v1/graphql', // Api Endpoint
defaultHeaders: { // Passing Headers
'x-hasura-admin-secret': 'aLkLIOh8P0DXvjzSjXhdwSeWQaKd65o'
}
);
// Creating client for graphql provider
static ValueNotifier<GraphQLClient> myClient = ValueNotifier(
  GraphQLClient(
    cache: GraphQLCache (
      store: InMemoryStore() // Store to keep our cache
    ),
    link: httpLink
  )
);
@override
Widget build(BuildContext context) {
  return GraphQLProvider(
    client: myClient,
    child: MaterialApp(
      title: 'Flutter Demo',
      theme: ThemeData(
        primarySwatch: Colors.grey,
      ),
      home: NoteApp(),
    ),
  );
}
}
Now, we have initialized GraphQL in our Flutter application and the complete application has access to the API's endpoint.
Part 2: Query
To make a query for notes, we will go to the notesArea.dart file and start by adding GraphQL package on top.
import 'package:graphql_flutter/graphql_flutter.dart';
First, we will understand the parts of this code and at the end of this section, you will find complete code for notesArea.dart file.
Here are the steps that we will follow in Part 2:
- Write the GraphQL query into a string variable.
- Use the Query widget to communicate with the endpoint.
Let's continue...
2.1: Writing the Query
Simply, create a String variable and pass a raw string of query to it. You can write queries in GraphQL Playground first and then copy the same string to your app.
My Query looks like this. I am asking for just two arguments, the title and the body of the notes.
static String getNotes = r"""
  query GetNotes{
    Notes {
      title
      body
    }
  }
  """;
2.2: Query widget
Now, we will wrap our widgets inside a Query widget, that is supplied by the graphql_flutter package. This will make our component, capable of communicating with the endpoint.
Step 1: Wrap it all inside the Query widget
Query(
    ...
)
Step 2: Query options
Query(
    options: QueryOptions(
          document: gql(getNotes)
    ),
    ...
)
QueryOptions: It takes an argument called document, in which we will pass our query string, which we save in getNotes string variable.
Also, we need to wrap our query inside gql() method from the GraphQL package to parse it into a GraphQL query.
Step 3: Builder
There is a required argument in the Query widget, which is the builder.
The builder takes a function with arguments of type QueryResult, Refetch, FetchMore, which are used to perform actions related to their names.
This function also returns the widgets that we want to use for the query.builder: (QueryResult result, {Refetch? refetch, FetchMore? fetchMore,}){ return RefreshIndicator( onRefresh: () async { await refetch?.call(); }, child: Container( padding: EdgeInsets.only(left: 15, right: 15), child: ListView.builder( itemCount: len, itemBuilder: (context, index){ return NoteTile( title: notes[index]["title"], body: notes[index]["body"], ); } ), ), ); }
Step 4: Playing with data
After implementing all of the steps mentioned above, the component will make a call to the endpoint, with the query, and we will get data from the API, and then it will be stored inside QueryResult.
Query(
  options: QueryOptions(
    document: gql(getNotes)
  ),
  builder: (QueryResult result, {Refetch? refetch, FetchMore? fetchMore,}){

    if(result.isLoading) {
      return Center(
        child: Text(
          'Loading...',
          style: TextStyle(color: kSecondaryAccentColor),
        )
      );
    }

    if(result.hasException) {
      return Center(
        child: Text(
          'Exception!!',
          style: TextStyle(color: Colors.red),
        )
      );
    }

    List notes = result.data?["Notes"];
    int len = notes.length;

    return RefreshIndicator(
      onRefresh: () async {
        await refetch?.call();
      },
      child: Container(
        padding: EdgeInsets.only(left: 15, right: 15),
        child: ListView.builder(
          itemCount: len,
          itemBuilder: (context, index){
            return NoteTile(
              title: notes[index]["title"],
              body: notes[index]["body"],
            );
          }
        ),
      ),
    );
  }
);
Now, let's understand the code we have here:
- QueryResult: When the query runs, we will get our data in the form of a list, inside the QueryResult argument, which is named as result.
- Access data: We can access the data from result variable. In our case, our list's name will be "Notes" that I checked through the GraphQL playground.
To access this list, we can make a call toresult.data["Notes"]. This will save all of our notes in the "notes" list. - result.isLoading: QueryResult argument has a function to check if the query is loading.
- result.hasException: QueryResult argument to check if an exception occurred during the query.
- Refetch: Another argument that the builder function has is Refetch, which is named as "refetch" here. It is used to make a call to the API, to re-fetch the same query.
I have made the re-fetch call inside the onRefresh property of the RefreshIndicator widget.

Find the final code for this file here.
Part 3: Mutation
To make a mutation to add a note, we will go to the createSheet.dart file and start by adding the GraphQL package on top.
import 'package:graphql_flutter/graphql_flutter.dart';
First, we will understand the parts of this code and at the end of this section, you will find complete code for createSheet.dart file.
Here are the steps that we will follow in Part 3:
- Write the GraphQL mutation into a string variable.
- Use the Mutation widget to communicate with the endpoint.
Let's continue...
3.1: Writing the Mutation query.
Simply, create a String variable and pass a raw string of mutation to it. You can write mutations in GraphQL Playground first and then copy the same string to your app.
My mutation to add a note looks like this. We will be passing two Query Variables to this mutation query and in return, we are asking for just two arguments, the title and the body of the notes.
static String addNote = r"""
  mutation insertNote($title: String!, $body: String!) {
    insert_Notes_one(object: {title: $title,body: $body}) {
      title
      body
    }
}
""";
3.2: Mutation widget.
Now, we will wrap our widgets inside a Mutation widget, that is supplied by the graphql_flutter package. This will make our component, capable of communicating with the endpoint.
Step 1: Wrap it all inside the Mutation Widget
Mutation (
    ...
)
Step 2: Mutation options
Mutation (
    options: MutationOptions(
          document: gql(addNote)
    ),
    ...
)
MutationOptions: It takes an argument called document, in which we will pass our query string, which we saved in addNote string variable.
Also, we need to wrap our mutation inside gql() method from the GraphQL package to parse it into a GraphQL mutation query.
Step 3: Builder
There is a required argument in the Mutation widget, which is the builder.
The builder takes a function with arguments of the type RunMutation and QueryResult, which are used to perform actions related to their names.
The builder also returns the widgets that we want to use for the mutation.builder: (RunMutation runMutation, QueryResult? result){ return Container( ... ); }
Step 4: Calling the mutation
After implementing all of the steps mentioned above, the component is ready to make a call to the endpoint, with the mutation query, we will send data to the API by using RunMutation and get a response in return, and then it will be stored inside QueryResult.
...
Mutation(
options: MutationOptions(
  document: gql(addNote),
  onError: (error) => print(error?.graphqlErrors),
  onCompleted: (dynamic resultdata) {
    if(resultdata != null) {
      Navigator.pop(context);
    }
  }
),
builder: (RunMutation runMutation, QueryResult? result){
  return Container(
    padding: const EdgeInsets.all(10.0),
    child: Column(
      children: [
        Row(
          children: [
            ...
            TextButton(
              style: TextButton.styleFrom(
                backgroundColor: kPrimaryColor,
                side: BorderSide.none,
                shape: RoundedRectangleBorder(
                  borderRadius: BorderRadius.circular(20.0)
                )
              ),
              onPressed: (){
                try {
                  runMutation({
                    "title": titleController.text,
                    "body": bodyController.text
                  });
                } catch (e) {
                  print("Error: e");
                }
              },
              child: Icon(
                Icons.add,
                size: 30,
                color: kSecondaryColor,
              )
            )
          ],
          ...
)
...
Now, let's understand the code we have here:
- RunMutation: This is the type of method that we can use to make the manual calls for mutation.
There is a TextButton, which has an onPressed property.
You can see, in onPressed, there is a function called runMutation, which is of type RunMutation. We are passing two arguments to runMutation function, these arguments are Query Variables that are required by our mutation query. - onError: This is a property of MutationOptions in which we can specify what to do if we encounter an error during the mutation query.
- onCompleted: This is also a property of MutationOptions, which is used to mention what to do after the mutation is complete. Here, we have access to data that is returned after mutation is complete.
- RunMutation: This is the type of method that we can use to make the manual calls for mutation.
Now, after submitting a new note, we will be redirected back to the home screen, and when we reload, it will show us new notes.
Find the final code for this file here.
Now, there is a problem with our app, we have to manually reload to fetch new notes.

We can solve this by clearing the client's store, which will re-fetch all queries automatically.
Continue to the next part to know how to do it.
Part 4: GraphQL Consumer
GraphQLConsumer is another widget by graphql_flutter package which can give us direct access to the GraphQLClient.
GraphQLClient provides many functions like:
- Accessing the GraphQLCache.
- Accessing the HttpLink.
- Run mutations, queries and many other operations of GraphQL.
- Resetting the cache-store.
What we need to do is reset the store, which we will do by using the client.
In the createSheet.dart file, we will use this GraphQLConsumer.
Let's start...
Here are the steps that we will follow in Part 4:
- Wrap GraphQLConsumer around our Mutation widget.
- When the Mutation completes, we will reset the store.
Step 1: Wrap it all inside the GraphQLConsumer Widget
GraphQLConsumer(
    builder: (GraphQLClient client){
      return Container(
        ...
            Mutation(
              options: MutationOptions(
                ...
              ),
              builder: (RunMutation runMutation, QueryResult? result){
                return Container(
        ...
);
- GraphQLConsumer has a property called builder.
- The builder takes a function with an argument of the type GraphQLClient, which will give us access to the client.
- Now, we will use this client in the next step.
Step 2: Reset the store with GraphQLClient
GraphQLConsumer(
    builder: (GraphQLClient client){
      return Container(
        ...
            Mutation(
              options: MutationOptions(
                document: gql(addNote),
                onError: (error) => print(error?.graphqlErrors),
                onCompleted: (dynamic resultdata) {
                  if(resultdata != null) {
                    client.resetStore();
                    Navigator.pop(context);
                  }
                }
              ),
              builder: (RunMutation runMutation, QueryResult? result){
                return Container(
        ...
);
- GraphQLClient gave us access to the client which is named as "client".
- As you can see, inside the MutationOptions, in the onCompleted property, when the query is done, client.resetStore() is called.
- client.resetStore() will reset the cache-store which we created at the beginning when we created the client.
- This will re-fetch all queries in the app's context and update the data.

Find complete project here
We are finally done.
Shoutout to graphql_flutter package.
This was an introduction to get you started if you want to use GraphQL with Flutter.
There is a lot more GraphQL can offer you, keep exploring!